Specifications
As of this writing, the following versions and code are used:- Ruby (1.9.2) and Rails (3.2)
- Carrierwave (via gem, 0.9.0)
- Cropbox
Scope and Limitations
This post will provide steps on using Cropbox with Carrierwave only. Which means, that by following the steps, your carrierwave is expected to be properly working already.Client Side Preparation
- Download the cropbox JS files needed. Then add it to your working project. Click here to download the files.
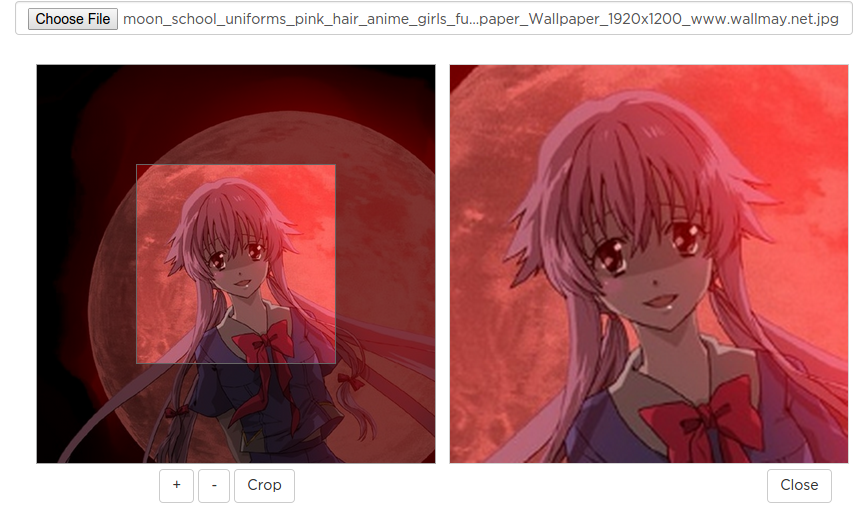
- Provide a UI for uploading and cropping of the image.
In my case, I used a modal box triggered by clicking the image to be replaced. My form inside the modal looks like this:
<div class="modal fade bs-example-modal-img" tabindex="-1" role="dialog" aria-labelledby="myLargeModalLabel" aria-hidden="true">
 <div class="modal-dialog modal-lg">
  <div class="modal-content">
   <div class="modal-header">
    <button type="button" class="close" data-dismiss="modal" aria-label="Close">
     <span aria-hidden="true">×</span>
    </button>
    <h4 class="modal-title" id="exampleModalLabel">
     User Avatar
    </h4>
   </div>

    <div class="modal-body">
     <div class="form-group">
      <%= file_field_tag "user_avatar", :class => 'form-control',  :accept => 'image/png,image/gif,image/jpeg' %>
     </div>
     <div class="row form-set">
      <div class="col-md-6">

          <div class="imageBox" id="avatarBox">
              <div class="thumbBox"></div>
              <div class="spinner" style="display: none">
               Loading...
              </div>
          </div>

          <div class="action">
              <input type="button" id="btnZoomIn" class="btnZoomIn avatar btn btn-default" value="+">
              <input type="button" id="btnZoomOut" class="btnZoomOut avatar btn btn-default" value="-">
              <input type="button" id="btnCrop" class="btnCrop avatar btn btn-default" value="Crop">
          </div>
      </div>
      <div class="col-md-6">
          <div class="cropped croppedAvatar">
            <!--PLACE DEFAULT IMAGE-->
            <image src="<%= @user.avatar.url %>" style="width:100%;" id="avatar-c" class="thumbnail" />
          </div>
          <div class="action">
              <button type="button" class="btn btn-default pull-right" data-dismiss="modal" aria-label="Close">
               Close
              </button>
          </div>
      </div>
     </div>
    </div>

  </div>
 </div>
</div>
My image that triggers the modal goes like this:
<image src="<%= @user.avatar.url %>" style="width:100%;" id="avatar" class="thumbnail" data-toggle="modal" data-target=".bs-example-modal-img" />
NOTE: I've used Twitter Bootstrap for the modal.
- Provide a hidden field for storing the datafile.
<%= hidden_field_tag :avatar_datafile %>
- I've added the following CSS styling just to make it appealing (optional)
<style type="text/css">
.imageBox{
    position: relative;
    height: 400px;
    width: 400px;
    border:1px solid #aaa;
    background: #fff;
    overflow: hidden;
    background-repeat: no-repeat;
    cursor:move;
}
.imageBox .thumbBox{
    position: absolute;
    top: 50%;
    left: 50%;
    width: 200px;
    height: 200px;
    margin-top: -100px;
    margin-left: -100px;
    border: 1px solid rgb(102, 102, 102);
    box-shadow: 0 0 0 1000px rgba(0, 0, 0, 0.5);
    background: none repeat scroll 0% 0% transparent;
}
.imageBox .spinner{
    position: absolute;
    top: 0;
    left: 0;
    bottom: 0;
    right: 0;
    text-align: center;
    line-height: 400px;
    background: rgba(0,0,0,0.7);
}
.cropped{
 border: 1px solid #d3d3d3;
 height: 400px;
 width: 400px;
 vertical-align:  middle;
 text-align: center;
}
.action{
 text-align: center;padding-top: 5px;
}
</style>
- Add the following scripts to your code. These should handle all events for you including calling the Cropbox JS.
<script type='text/javascript'>
 $(window).load(function() {

     var options =
     {
         thumbBox: '.thumbBox',
         spinner: '.spinner',
         imgSrc: '/assets/default.png'
     }

     var cropper;

  $("#user_avatar").on('change', function(){
         var reader = new FileReader();
         reader.onload = function(e) {
             options.imgSrc = e.target.result;
             cropper = $('#avatarBox').cropbox(options);
         }
         reader.readAsDataURL(this.files[0]);
         this.files = [];
     });


     // Crop handler.
     $('.btnCrop').on('click', function(){
      var img = cropper.getDataURL();

      // Place the cropped image's datafile.
         $('.croppedAvatar').html('<img src="'+img+'" width="100%">');

         // Place it to the default image. The one that triggers the modal.
         $('#avatar').attr('src', img);

         // Place the datafile value in the hidden field
  $('#avatar_datafile').val(img);
     });

     $('.btnZoomIn').on('click', function(){
      cropper.zoomIn();
     });

     $('.btnZoomOut').on('click', function(){
      cropper.zoomOut();
     });

 });

</script>
Server Side Preparation
- Now it's time to handle it on the server side. Start with adding the data conversion from data-image to
ActionDispatch::Http::UploadedFile
NOTE: This is based on Dave Hullihan's code which I revised a little allowing to convert a data-file string as it is other than passing it as an object.
On theapplication_controller.rb, add the following:
# Split up a data uri
def split_base64(uri_str)
  if uri_str.match(%r{^data:(.*?);(.*?),(.*)$})
    uri = Hash.new
    uri[:type] = $1 # "image/gif"
    uri[:encoder] = $2 # "base64"
    uri[:data] = $3 # data string
    uri[:extension] = $1.split('/')[1] # "gif"
    return uri
  else
    return nil
  end
end

# Convert data uri to uploaded file. Expects object hash, eg: params[:post]
def convert_data_uri_to_upload(data_uri)
  if !data_uri.blank?
    image_data = split_base64(data_uri)
    image_data_string = image_data[:data]
    image_data_binary = Base64.decode64(image_data_string)

    temp_img_file = Tempfile.new("data_uri-upload")
    temp_img_file.binmode
    temp_img_file << image_data_binary
    temp_img_file.rewind

    img_params = {:filename => "data-uri-img.#{image_data[:extension]}", :type => image_data[:type], :tempfile => temp_img_file}
    uploaded_file = ActionDispatch::Http::UploadedFile.new(img_params)

    return uploaded_file
  end

  return nil
end
The methods above will accept data URI and convert them to ActionDispatch objects which the carrierwave accepts.
- Remember the hidden fields we placed on the client-side? This will be used and processed.
Just convert this data URI (see the previous step) and pass this to your uploader attribute.
@user.avatar = convert_data_uri_to_upload(params[:user_avatar])
Then proceed with your saving.
A brief explanation
The Cropbox generates data-image which is a string. Unfortunately, carrierwave accepts the usual ActionDispatch::Http::UploadedFile only.
In that case, the data-image needs to be converted into such object so that carrierwave can accept it. Basically, it means decoding the data uri which is encoded on base64 and wrapping it into an object handled by carrierwave.
That's it. Save everything and then proceed with testing!
 Categories
No comments :
Post a Comment